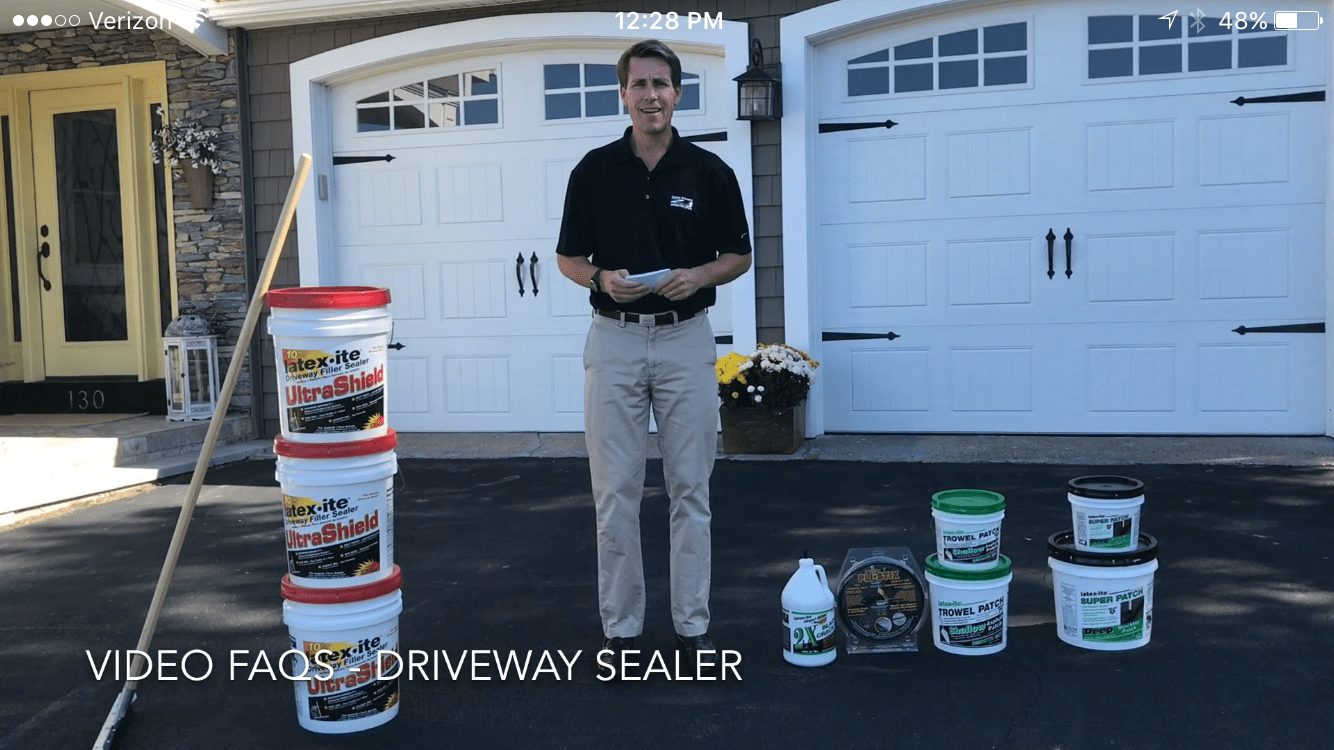
Can I watch these frequently asked questions in video format?
You sure can! We have answered them all – just click here to watch!


You sure can! We have answered them all – just click here to watch!
We do not recommend using a sprayer to apply our 5gal driveway sealers. Our sealers contain sand and this will clog up the sprayer. A sprayer will not apply our sealer evenly nor will it fill in the pores of the asphalt as a squeegee does.
Not to worry, power-steering/scuff marks are common when the temperatures and humidity are higher. The marks will subside in a week or two’s time, and any blemishes should be able to be swept out with a stiff broom or fade themselves. During this time period it is important to keep your wheels moving when turning as this will eliminate the likelihood of the marks.
The short answer is QUALITY — from both a product and application standpoint. On the product front, contractors use a “bulk” product and have the ability to water the product down resulting in much less “good stuff” on your driveway. With regards to application, many contractors spray the sealer down which leaves it sitting on top whereas a homeowner will (should) squeegee the sealer on which properly fills in the pores and last longer.
Drying is different than curing so when you have cooler nights (with a lower sun angle) it is hard for the sealer to properly cure and you risk tracking. We recommend using our Ultra Shield sealer in the cooler seasons (late Spring/early Fall) as it now has the ThermaSeal Technology which allows for curing down to 40 degrees F! Click here to learn more.
We recommend waiting at least 6 months prior to sealing to allow the natural distillates to emit from the blacktop. If your driveway beads up when water is sprayed on it … your driveway is not ready yet.
Well, #1 we strongly recommend using the proper tool…our 18″ Seal Right Squeegee and bearing down on it while applying as you want to leave a thin coat. Not applying enough pressure (especially on rough pavement) or using the wrong tool can result in putting it down too thick which may result in tracking.
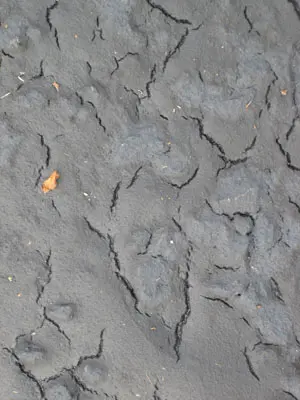
What you can do is pour a little water onto the mud cracked area right away and with a push broom work out those thick areas.
Sealer will be fine in the spring AS LONG AS it doesn’t freeze. Sealer is water based, so if it freezes, it will be ruined. Store it in a place that won’t freeze, put a towel down and keep them stored upside down. This will make it easier to stir in the spring! If you have a partially used pail you can put cellophane around top and secure with a rubber band. Then place the lid back on and remember not to let it freeze!
All pails are marked with the  on the bottom and can be recycled. The best way is to allow them to fully dry (which should be easy as you have most likely blocked the driveway off after you sealed – take the lids off and let them fully dry). Then you can simply place them on their side (on the ground), put your knee firmly on the pail so it bends a bit …and that will allow the dried film of sealer to fall off (you can discard that) leaving you a clean pail ready for recycling!
We recommend draining off the excess water on the top and leaving the pail open / outside so it can harden/dry. Your regular waste company will then be able to pick up and dispose of properly as it is non-hazardous.
For the sealers to adhere, the asphalt temperature must be 55 degrees F and rising. Typically March through early October are prime sealing days. Though most of us wait until fall to seal the driveway, you don’t have to. Once the temperature starts to get chilly and dip below 55 degrees F at night for an extended period of time (i.e. all night) it is too late to seal, and the sealer will not adhere properly — it may peel.
Latexite driveway sealers are meant only for asphalt driveways … not concrete (portland cement). With that said, many driveways have a concrete sidewalk that runs through their driveway. There are a couple simple steps to take prior to sealing which will ensure a clean, professional job and allow you to seal without getting any Latexite on the concrete.
We recommend you first “edge” the driveway by using a household broom. You can dip the broom in the pail of sealer and edge 6″ from the sidewalk (or bricks, etc). Another thing you can do is take masking tape and run it along the entire outer edge of the concrete. Do 2 or 3 passes so you have 4 to 5 inches of a border. Once you are done sealing, simply remove the tape and your concrete should not have any spills on it! If you still want more protection, simply lay a drop cloth down and tape it down as well. Also, don’t forget that your shoes will have wet sealer on them, so DON’T step on the concrete.
We recommend using a powerwasher that containts a mix of 50% water and 50% bleach – this will do the trick!
Does your driveway face north? Have a lot of tree cover? Have a retaining wall that creates shade? If you answered yes to any of these that most likely means you have algae or bacteria living on your driveway!
When you coat this with driveway sealer you’re going to have a problem…it’s not going to last. Why? Well, the asphalt sealer isn’t able to ‘grab’ on ‘bond’ to the surface. But have no fear, there is an easy solution: Let’s get rid of the algae so you can have a clean surface before you seal allowing the sealer to properly bond!
Here’s how to do it: Mix a 50/50 batch of water and bleach in a pump sprayer and spray over the affected area. Scrub the affected areas with a stiff broom to help loosen material. Once dry, power-wash or rinse thoroughly the affected areas to remove the algae completely.
That’s it. Now you will have much better results and a beautiful driveway!
“Super Patch” is used for areas of major repair. This product works on compaction, and works best when the troubled area has clearly defined side walls to push against. Once the product is properly compacted “Super Patch” will immediately set up.
“Trowel Patch” is used for less severe areas of repair. This product is ideal for depressions, cracks, and areas of alligation (rough areas). This product should be applied no thicker than 1/2″ lifts at a time. Two to three lifts might be necessary to fill troubled areas – make sure each lift has fully set up prior to applying another coat.
The only permanent crack filler is “Pli-Stix” or “Crack-Stix®” (same product, just different lengths) and can be purchased on our website. We recommend cleaning out the crack with a screwdriver and whiskbroom. Next, fill the crack with Pli-Stix (pushing it in the crack using a screwdriver). LEAVE ABOUT 1/8″ BELOW THE SURFACE — DON’T FILL THE CRACK TO THE TOP. After you’ve melted the Pli-Stix into the crack let it set up for an hour or so and then it is ready to be troweled over with Latex·ite® Trowel Patch. Once this sets up in about 2-4 hours you are ready to seal over it! Making it look like there was never a crack and good as new!
So remember, Pli-Stix, Trowel Patch, then seal…
Here is a helpful tip using the cane torch extender to apply Pli Stix or Crackstix!
“My torch extender won’t ignite, what can I do?”
Pull and/or scrape out the weeds with a screwdriver and clean crack with whiskbroom. You may also purchase weed killer at your local home center – Ortho Weed Killer does a great job but you will have to wait for weeds to die. Another solution, believe it or not, is to put table salt in the cracks… within a couple of days the grass should be gone.
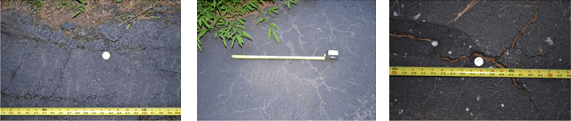
The pictures show some structural failure of the asphalt. i would recommend filling the larger cracks with our 2X Crack filler (after you scrape and clean out crack of course…whisk broom), and once cured apply a thin coat of our trowel patch product over top of the 2X and smaller surrounding cracks that untreatable with the 2X product. The Trowel Patch completed, I would recommend applying two thin coats of our optimum product over the entire driveway.
Not to worry, power-steering/scuff marks are common when the temperatures and humidity are higher. The marks will subside in a week or two’s time, and any blemish’s should be able to be swept out with a stiff broom or fade themselves. During this time period it is important to keep your wheels moving when turning as this will eliminate the likelihood of the marks.
Application marks are common on smooth driveways as the sealer has nothing to grab on to. Below please find a few hints to insure your second coat comes out better:
This can be the result of a few things that you should AVOID:
Well, #1 we strongly recommend using the proper tool…our 18″ Seal Right Squeegee and bearing down on it while applying as you want to leave a thin coat. Not applying enough pressure (especially on rough pavement) or using the wrong tool can result in putting it down too thick which may result in tracking.
What you can do is pour a little water onto the mud cracked area right away and with a push broom work out those thick areas.
If you are not comfortable using a squeegee for the edges, or for areas that may be bordered by bricks or pavers, we recommend using a broom or wallpaper brush. You can do the edge the entire driveway first and then seal the driveway up to where you’ve edged in. Also, you can tape off any bricks you have to make sure no sealer is splashed up on them!
COVERAGE – The application rate of driveway coatings is very important. If you don’t use enough, you’ll have untreated areas of the driveway. If you use too much, the sealer will never “set up” / cure properly and the excess may track into your home. It is recommended that you spread a thin layer of sealer (using steady down-pressure on the squeegee during application), let it cure overnight. Allow it to cure at least 24 hours prior to car traffic (you can walk on it after a couple of hours on a nice day). Please allow overnight to dry/cure prior to applying a 2nd coat. (Note: For the warranty to be valid a 2nd coat is required on some of our 5 gallon products – see package).
Coverage rates will vary by sealer and by the condition of your driveway. Remember, a driveway that has a lot of pores and hasn’t been sealed in a while will be thirsty and will require more sealer.
It is important to remember that you don’t want to run short when sealing the driveway. Make sure you purchase enough sealer because if you stop to take a break or run out of sealer and have to buy more you may get different shades when the driveway dries. This is because the pavement and outdoor temp were different when you did the driveway… but don’t worry: the driveway should blend to one uniform color in a week or two. If it doesn’t, let us know and we’ll help you out.
Generally speaking, here is a good guide for how many 5 gallon pails to buy:
For a rough, porous driveway with small cracks and voids:
300 – 400 sq. ft. per 5 gallon pail, per coat. The second coat will require about 1/3 less product (see example below).
For a smooth, previously sealed driveway:
400-500 sq. ft. per 5 gallon pail, per coat.
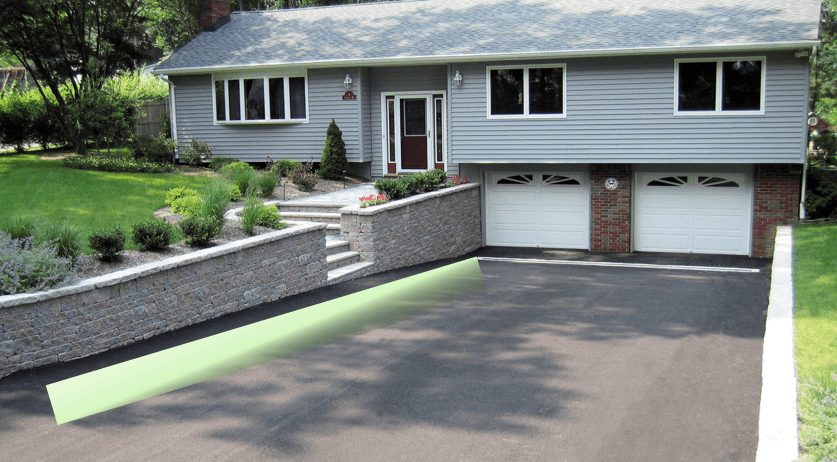
For example, if your driveway is 10 ft wide x 60 ft long = 600 sq ft. If the driveway is in rough condition you would need 2 pails for the first coat and 1 pail for the second coat: FOR A TOTAL OF 3 PAILS.
If sealing with Ultra Shield, Optimum, Airport Grade, Premium Plus, or Sand Mix:
The best applicator for a driveway is a squeegee. Brushes and rollers are simply the wrong tool for the job as they do not spread the sealer evenly nor do they properly fill the pores of your asphalt like a squeegee does. (Plus, the use of a roller voids our warranty!) If you want to edge the driveway first, you may do so with a paint brush. Latexite has designed a squeegee, the Latexite 18″ Seal-Right Squeegee, to make the job for you easier. It will save time and effort and can be washed off and re-used again!
Latex·ite 18″ Seal-Right Driveway Squeegee
If sealing with Acrylic Plus or Acrylic Grade:
Latexite Acrylic Plus and Acrylic Grade Driveway Sealers should be applied with a roller. We recommend using a 3/8” nap roller for smooth/previously sealed blacktop or 1/2″ nap roller for very porous/unsealed blacktop. Squeegees or brushes will not provide adequate coverage. DO NOT use a squeegee or brush with Acrylic Plus or you significantly risk cracking and/or peeling.
We recommend waiting until the first coat is fully dry / cured. It is best to give it 24 hours so that all areas, including the hairline cracks that get filled, are fully dry. If the driveway has been sealed early in the morning and the entire driveway is fully dry, you may put a second coat on later in the day.
Applying two coats of Latexite® will dry and cure much better than one thick coat. All Latexite®sealers are water based, which “cure” via evaporation. A thin coat will evaporate much faster than a thick coat will. If you apply one thick coat, you are “locking in” that initial coat and the sealer will hold water which causes tracking.
Unfortunately our sealers are not recommended to cover process rap or chip stone applications as the surface is too loose and our sealers do not act as a binding agent..
This is most likely caused when a brush has been used and the product was put down too thick! This is why we recommend using a squeegee and leaving a thin coat. You can alleviate the tracking by brooming the surface to remove loose particles on the surface.
There is sand in our Ultra, Optimum, Airport and Sand Mix products (and to a lesser extent in Acrylic Plus)….but yes, if you have a steep driveway you can add sand to the pail – 1 pound of sand per 5gal pail (play or masonry sand).
Yes, you are able to cut/dilute it by adding 1/2 gallon water maximum to pail.
Does your driveway face north? Have a lot of tree cover? Have a retaining wall that creates shade? If you answered yes to any of these that most likely means you have algae or bacteria living on your driveway!
When you coat this with driveway sealer you’re going to have a problem…it’s not going to last. Why? Well, the asphalt sealer isn’t able to ‘grab’ on ‘bond’ to the surface. But have no fear, there is an easy solution: Let’s get rid of the algae so you can have a clean surface before you seal allowing the sealer to properly bond!
Here’s how to do it: Mix a 50/50 batch of water and bleach in a pump sprayer and spray over the affected area. Scrub the affected areas with a stiff broom to help loosen material. Once dry, power-wash or rinse thoroughly the affected areas to remove the algae completely.
That’s it. Now you will have much better results and a beautiful driveway!
All of our driveway sealers will wash off with soap and water when the sealer is still wet. However, if it has dried there are a couple of ways to clean it up. First, any high performance cleaner that contains citrus does a good job. Second, a product called, “Solvall” seems to work well on many different surfaces. They can be reached at 1-800-724-7667 or www.emulso.com. They can UPS product to you.
All Latexite products are non-hazardous. If the sealer is still wet, rinse your pet’s paws off immediately using water. If the driveway sealer has dried on their paws it will not track, and it will eventually wear off.
We recommend first scraping off any heavier residue off the sides of the dryer. Once you have done this you can get any excess off using a material called, “Un-Du”. It is available to order by either visiting their site at: www.un-du.com or calling 952-929-9300.
You sure can! We have answered them all – just click here to watch!
Not to worry, power-steering/scuff marks are common when the temperatures and humidity are higher. The marks will subside in a week or two’s time, and any blemishes should be able to be swept out with a stiff broom or fade themselves. During this time period it is important to keep your wheels moving when turning as this will eliminate the likelihood of the marks.
The short answer is QUALITY — from both a product and application standpoint. On the product front, contractors use a “bulk” product and have the ability to water the product down resulting in much less “good stuff” on your driveway. With regards to application, many contractors spray the sealer down which leaves it sitting on top whereas a homeowner will (should) squeegee the sealer on which properly fills in the pores and last longer.
We recommend waiting at least 6 months prior to sealing to allow the natural distillates to emit from the blacktop. If your driveway beads up when water is sprayed on it … your driveway is not ready yet.
Well, #1 we strongly recommend using the proper tool…our 18″ Seal Right Squeegee and bearing down on it while applying as you want to leave a thin coat. Not applying enough pressure (especially on rough pavement) or using the wrong tool can result in putting it down too thick which may result in tracking.
What you can do is pour a little water onto the mud cracked area right away and with a push broom work out those thick areas.
Sealer will be fine in the spring AS LONG AS it doesn’t freeze. Sealer is water based, so if it freezes, it will be ruined. Store it in a place that won’t freeze, put a towel down and keep them stored upside down. This will make it easier to stir in the spring!
We recommend draining off the excess water on the top and leaving the pail open / outside so it can harden/dry. Your regular waste company will then be able to pick up and dispose of properly as it is non-hazardous.
For the sealers to adhere, the asphalt temperature must be 55 degrees F and rising. Typically March through early October are prime sealing days. Though most of us wait until fall to seal the driveway, you don’t have to. Once the temperature starts to get chilly and dip below 55 degrees F at night for an extended period of time (i.e. all night) it is too late to seal, and the sealer will not adhere properly — it may peel.
Latexite driveway sealers are meant only for asphalt driveways … not concrete (portland cement). With that said, many driveways have a concrete sidewalk that runs through their driveway. There are a couple simple steps to take prior to sealing which will ensure a clean, professional job and allow you to seal without getting any Latexite on the concrete.
We recommend you first “edge” the driveway by using a household broom. You can dip the broom in the pail of sealer and edge 6″ from the sidewalk (or bricks, etc). Another thing you can do is take masking tape and run it along the entire outer edge of the concrete. Do 2 or 3 passes so you have 4 to 5 inches of a border. Once you are done sealing, simply remove the tape and your concrete should not have any spills on it! If you still want more protection, simply lay a drop cloth down and tape it down as well. Also, don’t forget that your shoes will have wet sealer on them, so DON’T step on the concrete.
We recommend using a powerwasher that containts a mix of 50% water and 50% bleach – this will do the trick!
“Super Patch” is used for areas of major repair. This product works on compaction, and works best when the troubled area has clearly defined side walls to push against. Once the product is properly compacted “Super Patch” will immediately set up.
“Trowel Patch” is used for less severe areas of repair. This product is ideal for depressions, cracks, and areas of alligation (rough areas). This product should be applied no thicker than 1/2″ lifts at a time. Two to three lifts might be necessary to fill troubled areas – make sure each lift has fully set up prior to applying another coat.
The only permanent crack filler is “Pli-Stix” or “Crack-Stix®” (same product, just different lengths) and can be purchased on our website. We recommend cleaning out the crack with a screwdriver and whiskbroom. Next, fill the crack with Pli-Stix (pushing it in the crack using a screwdriver). LEAVE ABOUT 1/8″ BELOW THE SURFACE — DON’T FILL THE CRACK TO THE TOP. After you’ve melted the Pli-Stix into the crack let it set up for an hour or so and then it is ready to be troweled over with Latex·ite® Trowel Patch. Once this sets up in about 2-4 hours you are ready to seal over it! Making it look like there was never a crack and good as new!
So remember, Pli-Stix, Trowel Patch, then seal…
Pull and/or scrape out the weeds with a screwdriver and clean crack with whiskbroom. You may also purchase weed killer at your local home center – Ortho Weed Killer does a great job but you will have to wait for weeds to die. Another solution, believe it or not, is to put table salt in the cracks… within a couple of days the grass should be gone.
The pictures show some structural failure of the asphalt. i would recommend filling the larger cracks with our 2X Crack filler (after you scrape and clean out crack of course…whisk broom), and once cured apply a thin coat of our trowel patch product over top of the 2X and smaller surrounding cracks that untreatable with the 2X product. The Trowel Patch completed, I would recommend applying two thin coats of our optimum product over the entire driveway.
Not to worry, power-steering/scuff marks are common when the temperatures and humidity are higher. The marks will subside in a week or two’s time, and any blemish’s should be able to be swept out with a stiff broom or fade themselves. During this time period it is important to keep your wheels moving when turning as this will eliminate the likelihood of the marks.
Application marks are common on smooth driveways as the sealer has nothing to grab on to. Below please find a few hints to insure your second coat comes out better:
This can be the result of a few things that you should AVOID:
Well, #1 we strongly recommend using the proper tool…our 18″ Seal Right Squeegee and bearing down on it while applying as you want to leave a thin coat. Not applying enough pressure (especially on rough pavement) or using the wrong tool can result in putting it down too thick which may result in tracking.
What you can do is pour a little water onto the mud cracked area right away and with a push broom work out those thick areas.
If you are not comfortable using a squeegee for the edges, or for areas that may be bordered by bricks or pavers, we recommend using a broom or wallpaper brush. You can do the edge the entire driveway first and then seal the driveway up to where you’ve edged in. Also, you can tape off any bricks you have to make sure no sealer is splashed up on them!
COVERAGE – The application rate of driveway coatings is very important. If you don’t use enough, you’ll have untreated areas of the driveway. If you use too much, the sealer will never “set up” / cure properly and the excess may track into your home. It is recommended that you spread a thin layer of sealer (using steady down-pressure on the squeegee during application), let it cure overnight. Allow it to cure at least 24 hours prior to car traffic (you can walk on it after a couple of hours on a nice day). Please allow overnight to dry/cure prior to applying a 2nd coat. (Note: For the warranty to be valid a 2nd coat is required on some of our 5 gallon products – see package).
Coverage rates will vary by sealer and by the condition of your driveway. Remember, a driveway that has a lot of pores and hasn’t been sealed in a while will be thirsty and will require more sealer.
It is important to remember that you don’t want to run short when sealing the driveway. Make sure you purchase enough sealer because if you stop to take a break or run out of sealer and have to buy more you may get different shades when the driveway dries. This is because the pavement and outdoor temp were different when you did the driveway… but don’t worry: the driveway should blend to one uniform color in a week or two. If it doesn’t, let us know and we’ll help you out.
Generally speaking, here is a good guide for how many 5 gallon pails to buy:
For a rough, porous driveway with small cracks and voids:
300 – 400 sq. ft. per 5 gallon pail, per coat. The second coat will require about 1/3 less product (see example below).
For a smooth, previously sealed driveway:
400-600 sq. ft. per 5 gallon pail, per coat.
For example, if your driveway is 10 ft wide x 60 ft long = 600 sq ft. If the driveway is in rough condition you would need 2 pails for the first coat and 1 pail for the second coat: FOR A TOTAL OF 3 PAILS.
If sealing with Ultra Shield, Optimum, Airport Grade, Premium Plus, or Sand Mix:
The best applicator for a driveway is a squeegee. Brushes and rollers are simply the wrong tool for the job as they do not spread the sealer evenly nor do they properly fill the pores of your asphalt like a squeegee does. (Plus, the use of a roller voids our warranty!) If you want to edge the driveway first, you may do so with a paint brush. Latexite has designed a squeegee, the Latexite 18″ Seal-Right Squeegee, to make the job for you easier. It will save time and effort and can be washed off and re-used again!
Latex·ite 18″ Seal-Right Driveway Squeegee
If sealing with Acrylic Plus or Acrylic Grade:
Latexite Acrylic Plus and Acrylic Grade Driveway Sealers should be applied with a roller. We recommend using a 3/8” nap roller for smooth/previously sealed blacktop or 1/2″ nap roller for very porous/unsealed blacktop. Squeegees or brushes will not provide adequate coverage. DO NOT use a squeegee or brush with Acrylic Plus or you significantly risk cracking and/or peeling.
We recommend waiting until the first coat is fully dry / cured. It is best to give it 24 hours so that all areas, including the hairline cracks that get filled, are fully dry. If the driveway has been sealed early in the morning and the entire driveway is fully dry, you may put a second coat on later in the day.
Applying two coats of Latexite® will dry and cure much better than one thick coat. All Latexite®sealers are water based, which “cure” via evaporation. A thin coat will evaporate much faster than a thick coat will. If you apply one thick coat, you are “locking in” that initial coat and the sealer will hold water which causes tracking.
Unfortunately our sealers are not recommended to cover process rap or chip stone applications as the surface is too loose and our sealers do not act as a binding agent..
This is most likely caused when a brush has been used and the product was put down too thick! This is why we recommend using a squeegee and leaving a thin coat. You can alleviate the tracking by brooming the surface to remove loose particles on the surface.
There is sand in our Ultra, Optimum, Airport and Sand Mix products (and to a lesser extent in Acrylic Plus)….but yes, if you have a steep driveway you can add sand to the pail – 1 pound of sand per 5gal pail (play or masonry sand).
Yes, you are able to cut/dilute it by adding 1/2 gallon water maximum to pail.
All of our driveway sealers will wash off with soap and water when the sealer is still wet. However, if it has dried there are a couple of ways to clean it up. First, any high performance cleaner that contains citrus does a good job. Second, a product called, “Solvall” seems to work well on many different surfaces. They can be reached at 1-716-854-2889 or www.emulso.com. They can UPS product to you.
All Latexite products are non-hazardous. If the sealer is still wet, rinse your pet’s paws off immediately using water. If the driveway sealer has dried on their paws it will not track, and it will eventually wear off.
We recommend first scraping off any heavier residue off the sides of the dryer. Once you have done this you can get any excess off using a material called, “Un-Du”. It is available to order by either visiting their site at: www.un-du.com or calling 952-929-9300.
